Build: a ClockClock 24 on 24 round screens
24 round displays forming one ClockClock 24, driven
by 8 XIAO ESP32-S3 boards with 3 panels each. Every board runs the same
lvgl_clock clockclock24 engine, and each panel renders
one of the 24 mini-clocks (partial: 0…23), so the digit sweeps,
movement: directions and idle animations stay identical across the wall by
construction.
One board has Wi-Fi and SNTP and broadcasts the time over a one-wire UART bus; the other seven listen. The master drives three panels too — it is board D, not a ninth box.
Finished wall: ≈ 27 × 13 cm and 730 g — light enough to hang on two screws.
Status: running on hardware — all eight boards built, the full 24-clock wall. Watch it run · see First full build, and
PROTOTYPE.mdfor how it got there.Cost: roughly €207–€374 for the full 24-clock wall — the spread is almost entirely where you buy the XIAOs. See BOM and cost.
This page is what it is, what you need, and how to configure it. The rest of the build is next door:
| Assembly, wiring and flashing | Putting it together, in the order the steps happen |
| Technical details | Pin budget, PCB, clock numbering, sync protocol, power, memory |
| First prototype | Twelve clocks on four boards — the more useful thing to look at while building |
First full build
All eight boards, all 24 clocks, in a printed case.
Watch it run — the digit sweeps and the choreographies, at speed.
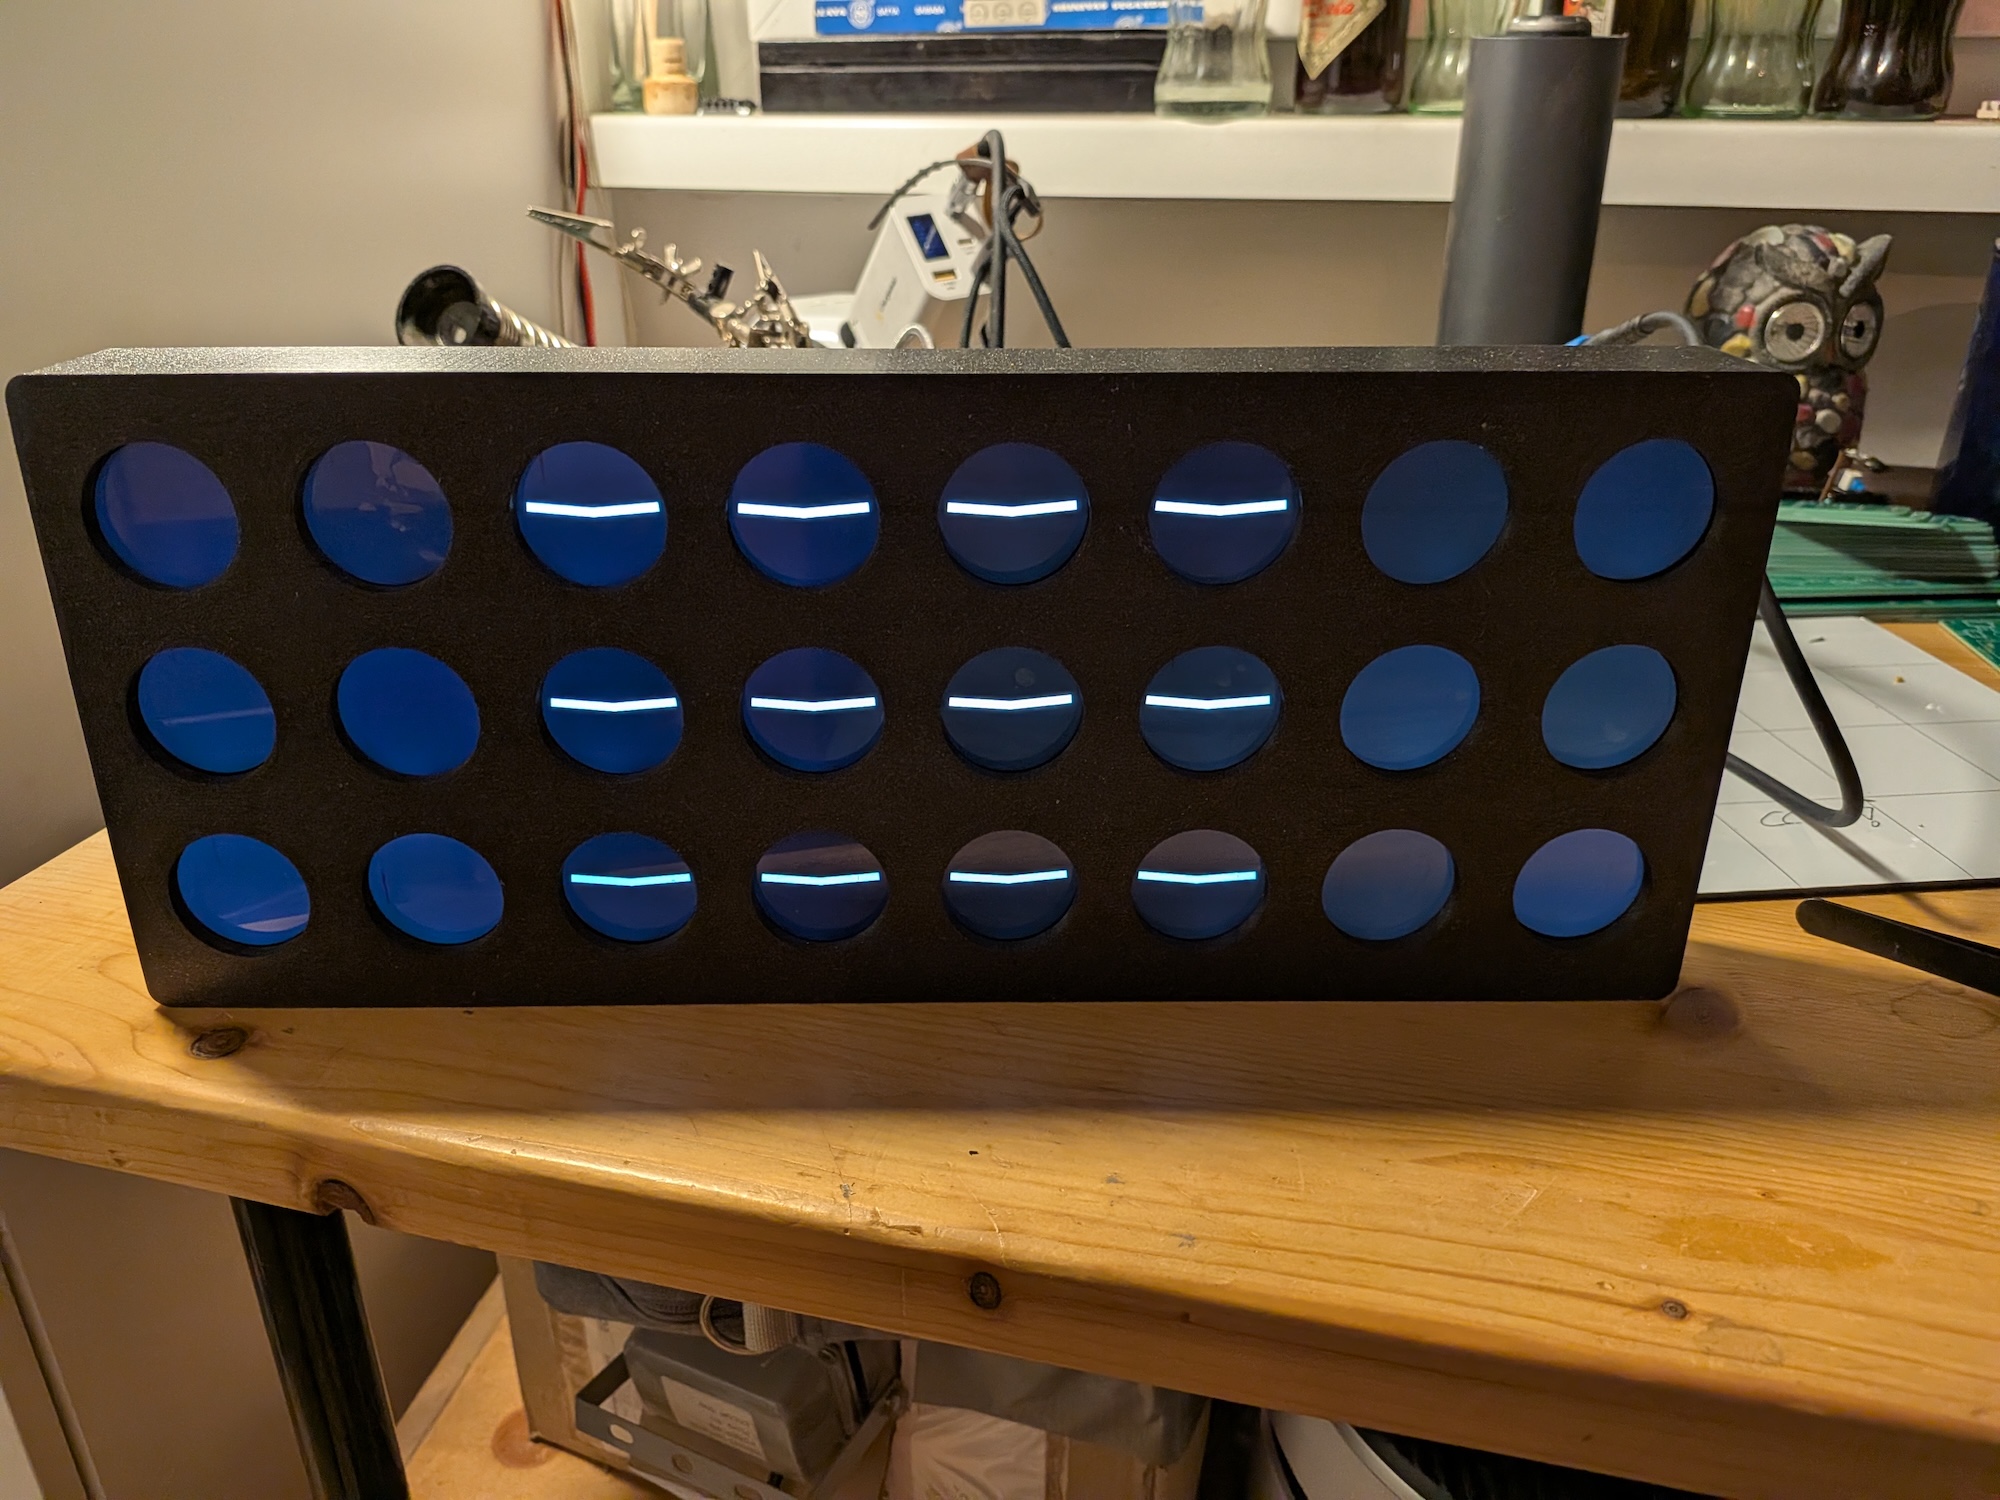
Front on, mid-test: all 24 panels mounted, four columns driven. The case is one printed part with 24 round cutouts; the panels sit behind it so only the round glass shows.
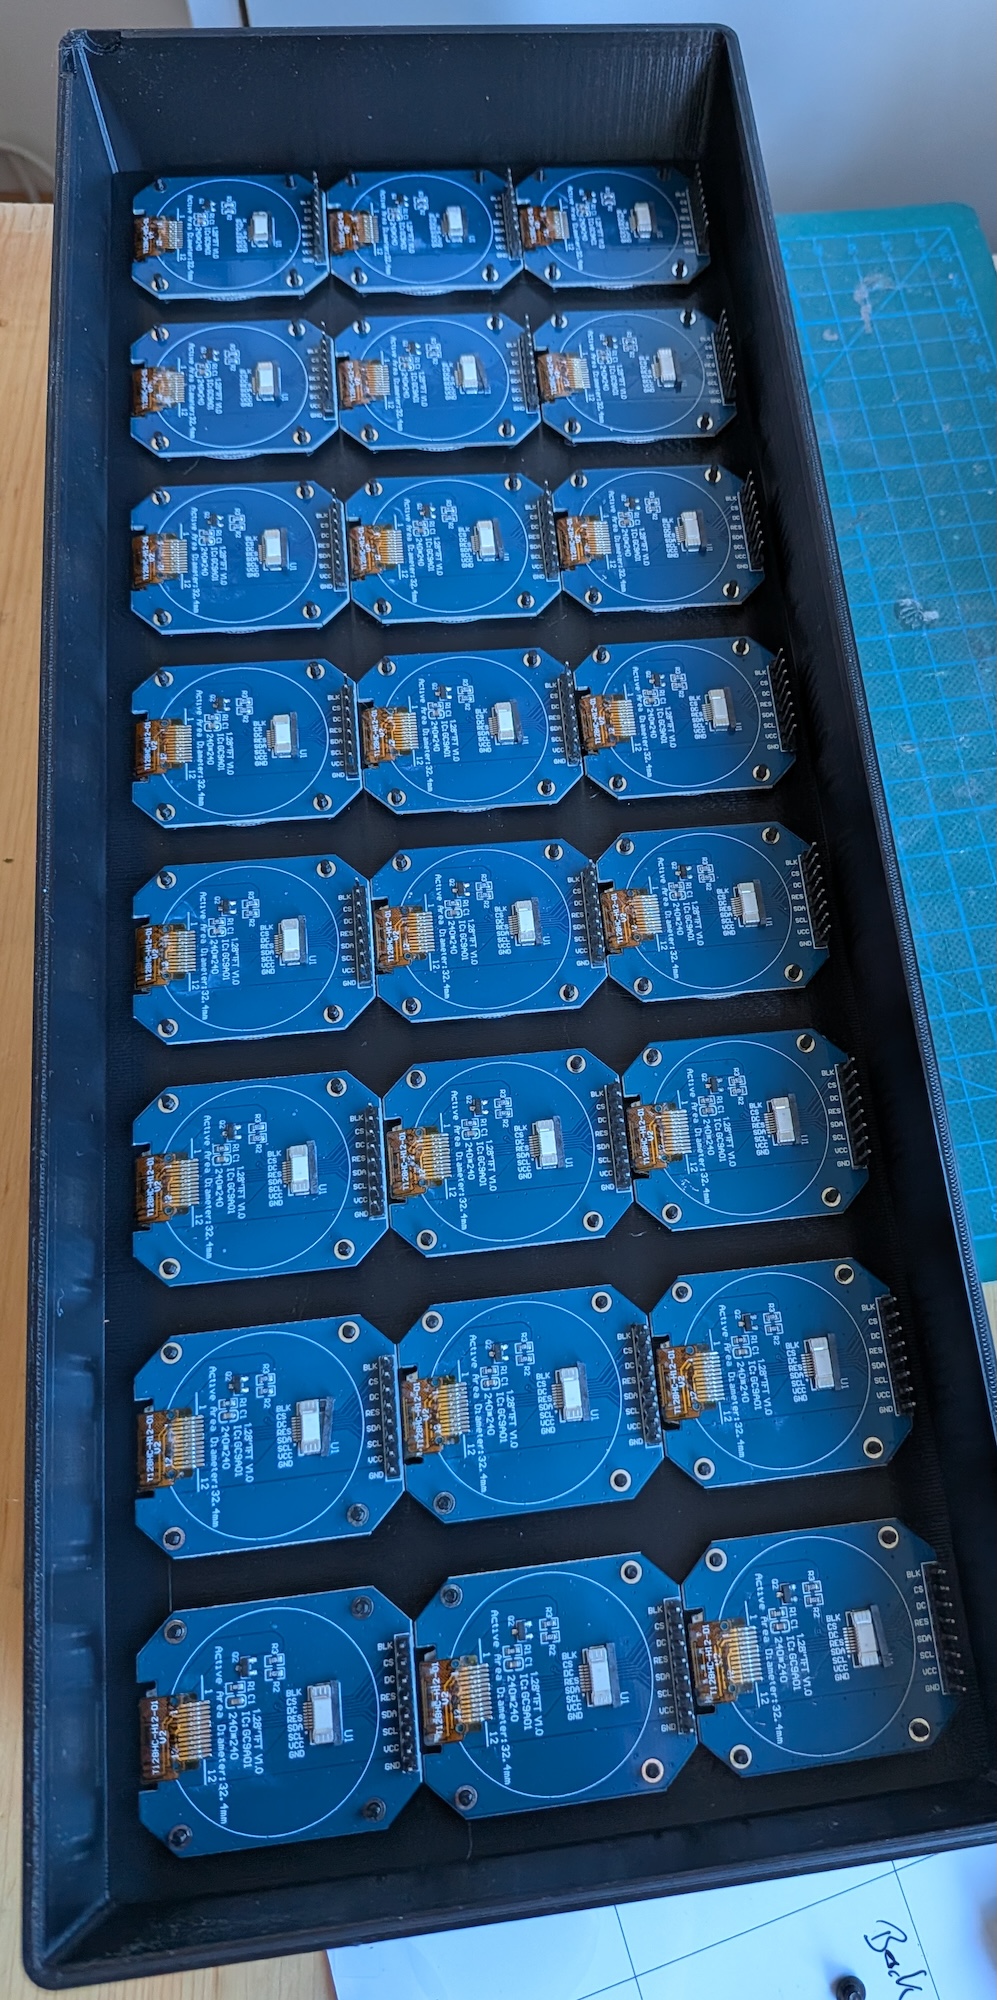
The same case from behind, with all 24 panels seated — eight rows of three, one row per carrier board. Each panel’s 8-pin header points inwards, ready for the carrier to drop onto it.
All eight carriers then push onto those headers and chain together — see step 11.
What you need
BOM and cost
Everything for the full eight-board, 24-clock wall. Quantities come from the netlist; prices are what the parts cost when they were last checked, so treat them as a starting point rather than a quote.
| Part | Qty | € / unit | € total | Where / note |
|---|---|---|---|---|
| 1.28″ 240×240 round GC9A01A panel | 25 | 4.7 – 5.6 | 118 – 140 | 5-pack, €23.49 — 5 packs: 24 used, 1 spare |
| Seeed XIAO ESP32-S3 | 8 | 5.6 – 15.2 | 45 – 122 | 3-pack ~€15 at Seeed vs €15.16 each on Amazon |
| Custom PCB — gerbers | 8 | 2.5 – 3.8 | 20 – 30 | one fab order, 2-layer 34 × 131.6 mm |
MP1584EN buck module — U7 |
2 | 1 – 5 | 2 – 10 | 10-pack, €10. Not one per board — see How many regulators |
JST-XH 4-pin connector — CN1, CN2 |
16 | 0.2 – 0.4 | 3 – 6 | chain in / chain out; sold in 20/50-packs |
JST-XH 2-pin connector — U8 |
0 – 1 | 0.2 – 0.4 | 0 – 1 | Optional, and only on the board you feed — skip it if you power the wall by plugging USB-C into that board’s XIAO |
| 4-way chain cable — housing, crimps, wire | 7 | 0.7 – 1.6 | 5 – 11 | one per hop between boards |
8-pin female header 2.54 mm — U3/U4/U5 |
24 | 0.2 – 0.4 | 5 – 10 | one per panel; or cut from 40-pin strips |
7-pin female header 2.54 mm — U6 |
16 | 0.2 – 0.4 | 3 – 6 | the XIAO socket, 2 × 7; also cut from strips |
100 nF 0805 — C1–C3 |
24 | < 0.1 | 1 – 2 | All 24 fitted on the built wall. The only SMD part — sold in 100-packs |
220 µF electrolytic — C6 |
0 – 8 | 0.1 – 0.3 | 0 – 3 | Optional — none fitted on the built wall. Bulk on the 5 V rail; through-hole, 6.3 mm |
100 µF electrolytic — C5 |
1 – 8 | 0.2 – 0.4 | 0 – 3 | One was enough for the whole wall. Bulk on the 3.3 V rail; through-hole, 6.3 mm |
| 5 V 2 A USB supply | 1 | 0 – 15 | 0 – 15 | one for the whole wall; €0 if you have one |
| 3D-printed frame | 1 | 5 – 15 | 5 – 15 | filament only, if you print it yourself |
| Total | € 207 – 374 |
Where the money goes. The panels are the floor — €118 of it, and there is no way around 24 displays. The one real decision is the XIAO: buying 3-packs from Seeed instead of singles from Amazon saves about €77, a third of the cheap build. Everything else together is under €60.
Reading the table. Qty is what the finished wall holds, and every row
multiplies out — qty × unit = total. The unit prices for passives and headers
are pack prices divided down, because nobody sells 24 individual 0805s: you
buy a 100-pack, a couple of 40-pin header strips and a bag of XH housings, pay
the pack price once and keep the remainder. So the small rows are what those
parts cost you here, not what you will spend at the checkout — expect a few
euro more and a drawer of spares.
What the built wall actually has fitted, which is less than the table allows for:
- All 24 × 100 nF (
C1–C3, one per panel header). These are the ones worth having — they sit right at the panels and cost almost nothing. - One 100 µF on the 3.3 V rail, for the whole wall rather than one per board.
- No 220 µF at all.
C6is empty on every board.
That runs fine, so treat the 0 low bounds in the table as real rather than
theoretical. The reasoning holds: bulk on the rails is there to stop 24
backlights striking at once from dragging the supply down, and one bulk cap
near the single regulator does that as well as sixteen spread along the chain.
Three things that are not eight-off, and are easy to over-order:
- The MP1584EN. One or two modules feed the whole chain; the rest of the boards leave the footprint empty. A 10-pack is already several builds’ worth.
- The 5 V supply. A single 5 V 2 A USB supply is fine for the whole wall — all eight boards together draw ~1.2 A. One supply, fed into the middle of the row; not one per board.
- The
U82-pin connector. Only the board you feed needs one, and even that one is optional: USB-C into that board’s XIAO lands on the same+5 Vnet, so you can populate none of them.
3D-printed frame
One printed part: a face plate with 24 round cutouts and a tray behind it that
holds the eight carrier boards at the right spacing. Files are in
3dprinting/.
| File | |
|---|---|
ClockClock24_full.obj |
The case in one piece, 365.5 × 149 × 40 mm. Needs a Prusa XL-sized bed or bigger — and at 365.5 mm it is longer than the XL’s 360 mm axis, so rotate it 45° on the plate |
ClockClock24_a.obj + ClockClock24_b.obj |
The same case split in two, 183 × 149 × 40 mm each — fits a 250 × 210 bed. Print both and join |
clockclock24.f3d |
Fusion 360 source, if you want to change it |
Print it opaque. This is the one setting that matters, and it is not about strength: the panels are backlit, and a wall that lets light through the case glows around every cutout instead of showing 24 clean discs on black. So:
- Enough top and bottom layers to fully close the surface — more than the slicer’s default. A single thin spot is a visible bright patch.
- Solid infill for the walls. The vertical faces between the cutouts are thin, and sparse infill there leaks light between neighbouring panels.
Dark filament helps but does not replace either of those — black PLA printed thin still glows.
Face down on the plate, no supports. The visible face prints against the build sheet, so whatever texture that sheet has is the finish you get on the front. Nothing structural, no fine detail, any material you like.
.objrather than.stl— PrusaSlicer, OrcaSlicer and Cura all import it directly.
How to build
→ Assembly, wiring and flashing — the whole sequence, from seating the first panel to the flashing order that matters.
How to configure
Almost everything you would want to change is in panel.yaml
— written once and applied to all 24 clocks, because every panel is that same
file included with different vars. Colours live in
common_base_esp32_s3_xiao.yaml, and the
timezone in the role files. Nothing here needs editing a board file.
Most of it you no longer reflash for. The mode, the cycle list and its interval, the eight pattern slots, and now
movement,transition_lengthandmode_speedare all set on the master at runtime and broadcast down the bus. The values below are the compile-time defaults — where the wall starts, not where it is stuck. See From Home Assistant below.They are broadcast rather than set per board for a reason: anything that affects timing must be identical everywhere, because each board runs the choreography from its own clock. Two boards on different values drift out of phase rather than merely out of step. Sending them from one place is what makes that impossible to get wrong.
Genuinely compile-time — reflash all eight to change these: colours,
hand_width,startup_align,sync_dot,show_face, and the pin map.
Which choreographies play, and when
In panel.yaml, under clockclock24::
cycle_modes:
  interval: 1min      # how often to move to the next entry in the list
  modes:
    - birds
    - temp
    - wave
    - temp
The list is walked in order and wraps, so repeating an entry — as temp
does above — simply shows it more often. Each window runs from :10 to :45
past the minute and then settles back to the time; that timing is fixed, and
interval: only sets the cadence. Delete the whole cycle_modes: block and
the wall just tells the time.
| Mode | What it does |
|---|---|
birds (flying_birds) |
Hands sweep across the wall like a flock, left to right, ramping up |
wave |
A rotation travelling left to right, each column 15° behind the last |
spiral |
Every clock turning, offset along the diagonal |
wind |
Hands stand like grass; wind bends the top row right, the bottom row left, then releases |
rotating_maze |
A chevron field turning, rows counter-rotating, easing almost to a stop on each aligned figure |
zipper |
A front runs across a field of diagonals, unzipping each column into mirrored chevrons |
mirror_wave |
Vertical strokes scissor open, mirrored about the wall’s centre, spreading outwards from the middle |
pattern |
Plays a pattern from patterns/ — authored in the sim, pushed to every board over the bus |
love |
Spells LOVE across the four digits |
temp |
The temperature, as -9…99 plus °C |
rotate_left |
A plain continuous rotation |
time |
The clock. What every window returns to |
demo |
A fake minute every 5 s, for bring-up. Not valid in cycle_modes: |
Look and feel
clockclock24:
  movement: opposite        # opposite | clockwise | counter | long
  transition_length: 5s     # how long a digit change takes to sweep
  mode_speed: 1             # idle-animation speed, ×1.0 = the base rates
  startup_align: 10s        # hold every hand at 12 for this long after boot
  sync_dot: true            # blink a dot while a board is out of sync
  show_face: false          # draw the little clock faces behind the hands
  hand_width: 1             # base hand thickness, px
movement:decides which way a hand travels to its new position.oppositesends the two hands of a clock in opposite directions, which is the ClockClock look;longtakes the scenic route.transition_length:is also the fade in and out of a choreography, so raising it makes mode changes gentler as well as digit changes slower.mode_speed:scales the idle animations only. The base rates are already unhurried — awaverevolution takes 15.3 s — so this is rarely worth touching.movement,transition_lengthandmode_speedare also Home Assistant entities on the master, and what you set here is only the starting value. Changing the speed live is the interesting one: a choreography is evaluated att × mode_speed, so a new multiplier moves where the animation is, not just how fast it runs from there. The wall blends into the new position rather than snapping — the same thing it does entering a mode — and every board applies the same number from the same packet, so it eases across together instead of falling out of phase.show_face: truedraws a filled disc behind each pair of hands incc_faces. It is off because a filled 240 px disc is the most expensive thing in the frame, and invisible in white-on-black anyway.sync_dot:is a diagnostic, not decoration: a healthy wall shows nothing. Leave it on — see The sync dot.
Colours
Three named colours in the base package, shared by every panel:
color:
  - id: cc_hands      # the hands
    red: 100%
    green: 100%
    blue: 100%
  - id: cc_bg         # the background
    red: 0%
    green: 0%
    blue: 0%
  - id: cc_faces      # the face discs, only drawn when show_face: true
    red: 12%
    green: 12%
    blue: 14%
panel.yaml references them as foreground: cc_hands / background: cc_bg.
White on black is the original’s look and the cheapest to draw, but nothing
stops you making the hands amber.
These are only the starting values. Both are Home Assistant entities on the master and both go on the wire, so one automation changes all 24 clocks:
automation:
  - alias: Warm the wall after sunset
    trigger: { platform: sun, event: sunset }
    action:
      - service: text.set_value
        target: { entity_id: text.cc24_board_d_hand_colour }
        data:   { value: "#ff8c3c" }
cc_faces is still compile-time — it is only drawn when show_face: true,
which is off.
Timezone and temperature
Both are master-only, because both travel down the sync bus to the other seven
boards. In board_d.yaml:
time:
  - platform: sntp
    id: clock_time
    timezone: "CET-1CEST,M3.5.0,M10.5.0/3"
mode: temp shows whatever sensor is named by temperature_sensor_id: on the
broadcaster. The shipped config uses a template sensor that walks 18→24 °C so
the digits visibly change; swap the platform for a real one and keep the id:
sensor:
  - platform: dht          # or bme280, homeassistant, ...
    id: room_temp
Only the master needs one. The reading rides along in the sync packet, so the other seven show the same number without a sensor of their own — eight sensors would just be eight opinions about the same room.
At runtime, from Home Assistant
The master is the only board with a network, and everything the wall does at runtime is one of its entities. Nothing below is recompiled or reflashed — the values go down the sync bus to the other seven boards.
| Entity | |
|---|---|
select.…_mode |
What the wall is doing. An override — with a cycle interval set, the next window takes it back. Set the interval to off to make a choice stick |
select.…_pattern |
Which slot pattern draws |
select.…_cycle_interval |
How often a window opens, or off |
select.…_movement |
opposite / clockwise / counter / long |
number.…_transition_length |
Sweep time, in seconds |
number.…_mode_speed |
Choreography rate, ×1 is the base |
text.…_hand_colour |
#rrggbb. Anything that is not a colour is refused and logged, not guessed at |
text.…_background_colour |
#rrggbb |
text.…_cycle_modes |
The rotation, in order — repeats count |
text.…_pattern_1 … |
The pattern slots, read and write |
button.…_reload_patterns_from_firmware |
Back to the patterns/ folder as compiled in |
button.…_reset_look_to_firmware |
Back to the look panel.yaml compiled in — see below |
All of it reaches the other seven boards over the bus. Nothing is recompiled
and nothing is reflashed.
A cycle list takes pattern names. wind,fan,love,shear plays those two
patterns by name rather than leaving it to a round-robin — the list reads back
with the names too, so you can see what was accepted. A bare pattern still
means “the next one in the store”, advanced once per window.
Mode is an override, not a preference. With a cycle interval set, the
next window opens on schedule and takes the wall back, and between windows the
wall goes back to telling the time — picking a choreography says “show me
this now”, never “stop being a clock”. Set the interval to off and the
rotation stops entirely — the wall then shows whatever Mode says and only
changes when you or an automation change it.
Edits are saved to flash, so the wall keeps them with Home Assistant off — the seven listeners still need nothing but power and a wire. A pattern write is pushed down the bus straight away rather than at the next repeat.
See Motion patterns for the packing, the wire format and the timing.
Which means automations
They are ordinary entities, so the wall does what any other device in the house does. A night mode is two service calls:
automation:
  - alias: "ClockClock — night"
    trigger: { platform: sun, event: sunset, offset: "-00:30:00" }
    action:
      - service: text.set_value
        target: { entity_id: text.cc24_board_d_hand_colour }
        data: { value: "#ff7a2f" }          # warm amber, on the wire in one packet
      - service: number.set_value
        target: { entity_id: number.cc24_board_d_mode_speed }
        data: { value: 0.6 }                # slower, so it is not the brightest
                                            # moving thing in a dark room
  - alias: "ClockClock — day"
    trigger: { platform: sun, event: sunrise }
    action:
      - service: text.set_value
        target: { entity_id: text.cc24_board_d_hand_colour }
        data: { value: "#ffffff" }
      - service: number.set_value
        target: { entity_id: number.cc24_board_d_mode_speed }
        data: { value: 1.0 }
The colour change is one broadcast packet, so all 24 clocks turn amber on the
same frame rather than sweeping across the wall board by board. Same for a
text.set_value on …_cycle_modes — a quiet rotation at night and the lively
one by day is one automation, not a reflash.
It survives a restart
Movement, sweep length, speed, both colours, the cycle list and its interval are written to flash about ten seconds after you change them — held that long because NVS has a finite erase count and a colour picker fires all the way round the wheel. The wall comes back the way you left it after a power cut, exactly as patterns already did.
Which has a consequence worth knowing: flash now wins over panel.yaml.
Edit mode_speed there, reflash, and nothing visible happens, because the
saved value is applied over it at boot. Reset look to firmware is the way
back — the same role Reload patterns from firmware plays for patterns. The
compiled-in values are captured at startup before flash is read, so the
button always has something true to restore.
The mode itself is deliberately not saved: the wall should come back telling the time, not stuck in whatever choreography was running when the power went.
board_d.yaml also declares a project marker, which is how anything looking
for the wall finds it rather than guessing at entity names:
esphome:
  name: cc24-board-d
  project:
    name: "tuct.digitalclockclock24"      # manufacturer / model in HA
    version: "1.1"
You do not have to type any of those entity ids. The add-on puts the whole lot on one page — a live preview of what the wall is showing, the mode with your own patterns in the same list by name, the cycle list as chips you drag, the interval, the movement, the sweep length, the choreography speed and both colours. Add this repository under Settings → Add-ons → Repositories.
Motion patterns
Beyond the built-in choreographies, mode: pattern plays a pattern: 24
per-clock poses and speeds that are data, not code. Up to 8 of them live
on the master, and their names go straight into cycle_modes.
You draw one in the add-on’s pattern editor and press Send — the master saves it to flash, pushes it down the bus, and the wall is running it a second later, with nothing recompiled and nothing reflashed, not even the master. See the editor.
The patterns/ folder is the other route: a <name>.json per
pattern, baked into the master at compile time and pushed to the seven
listeners 30 s after boot. That is where a pattern you want in the firmware
itself belongs — Reload patterns from firmware goes back to exactly this set.
See Motion patterns for the packing, the wire format and the timing.
How it works
→ Technical details — the pin budget and why the sync bus cannot sit on D6, the carrier PCB, how the 24 clocks are numbered, the sync protocol, power, memory, and how the YAML files compose.