Levoit Vital 100S - Custom Firmware (ESPHome)
Quick Facts
| Item | Value |
|---|---|
| Model | Vital 100S |
| Tested MCU FW | 1.0.5 |
| ESP Module | ESP32-C3-SOLO-1 |
| Board | Vital 100S-C_V1.3P1.4 20221027 |
| Fan Speeds | 4 |
| CADR (spec) | 221 m³/h |
| Room Size | 9–52 m² (97–560 ft²) |
| ESPHome | 2026.1.2+ |
Features
| Feature | Type | Notes |
|---|---|---|
| Fan | fan | 4 speeds, presets: Manual / Auto / Sleep / Pet |
| Auto Mode | select | Default / Quiet / Efficient |
| Auto Mode Room Size | number | 9–52 m² |
| Auto Mode High Fan Time | text_sensor | Remaining high-speed runtime in efficient mode |
| Efficiency Counter | sensor | Seconds remaining at high fan speed |
| Display | switch | Toggle LED display |
| Child Lock | switch | |
| Light Detect | switch | Auto-dims display when ambient light is low |
| PM2.5 | sensor | µg/m³ |
| AQI | sensor | As reported by MCU |
| Current CADR | sensor | m³/h, updated every 5s |
| Filter Life Left | sensor | % remaining |
| Filter Low | binary_sensor | On when < 5% |
| Filter Lifetime | number | Configurable in months |
| Reset Filter Stats | button | Resets CADR/runtime counters |
| Timer | number | Run timer in minutes |
| MCU Version | text_sensor | |
| Error | text_sensor | “Ok” or “Sensor Error” |
Teardown / Disassembly
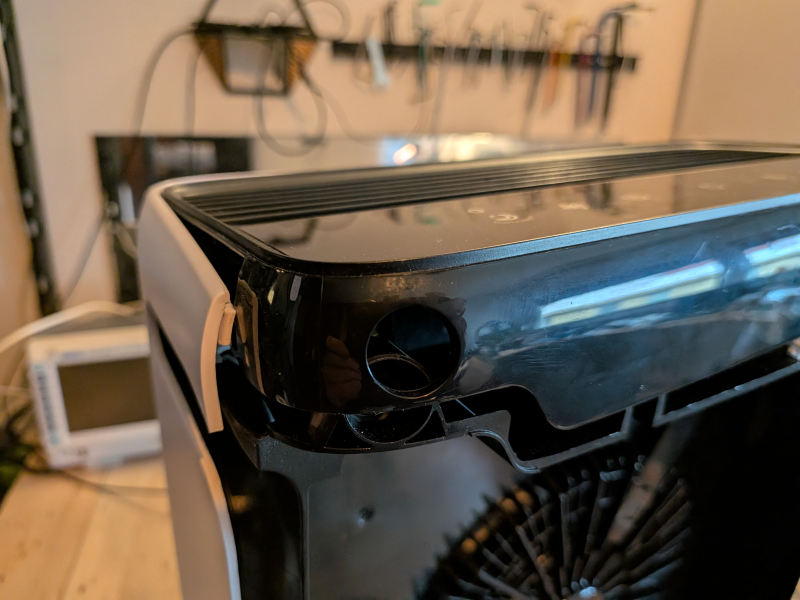
Remove the top cover to access the PCB. Start by carefully opening the left side with a plastic pry tool or kitchen knife:

There are hooks on each side — you need some force, but be gentle:
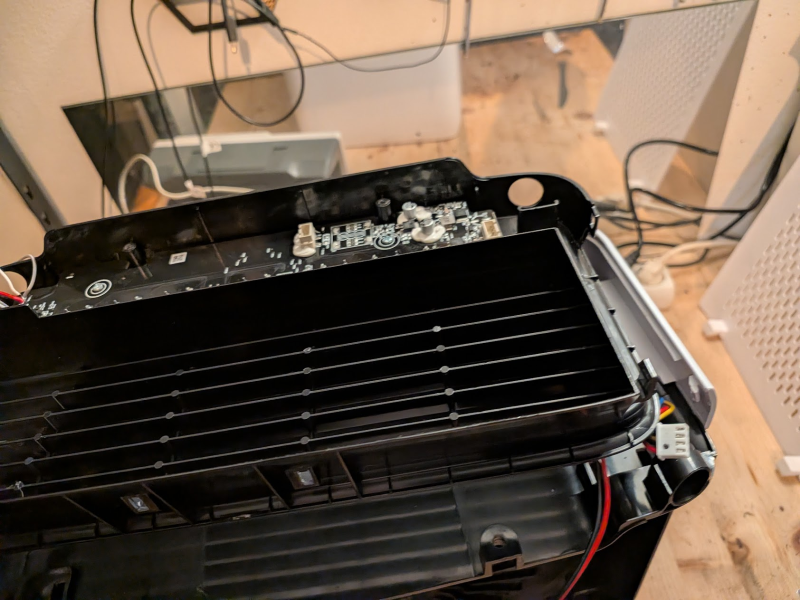
Open both sides, then pull firmly upward:
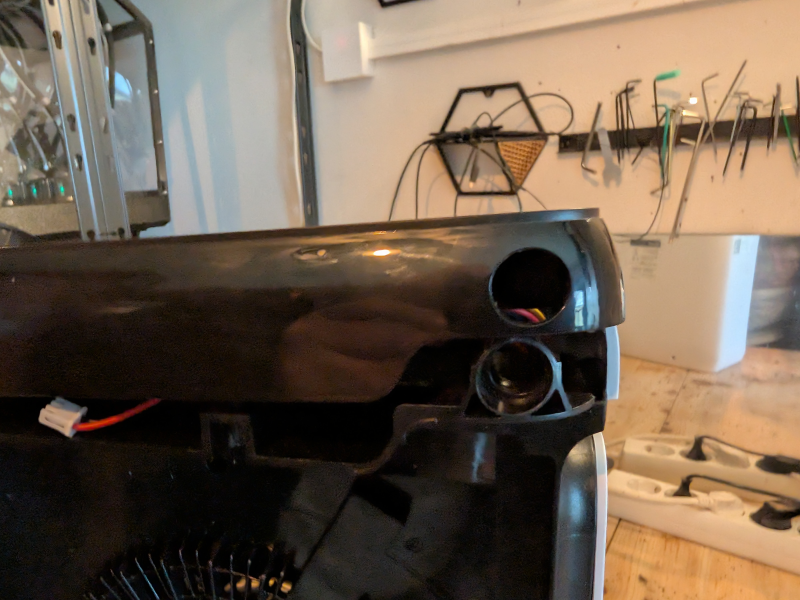
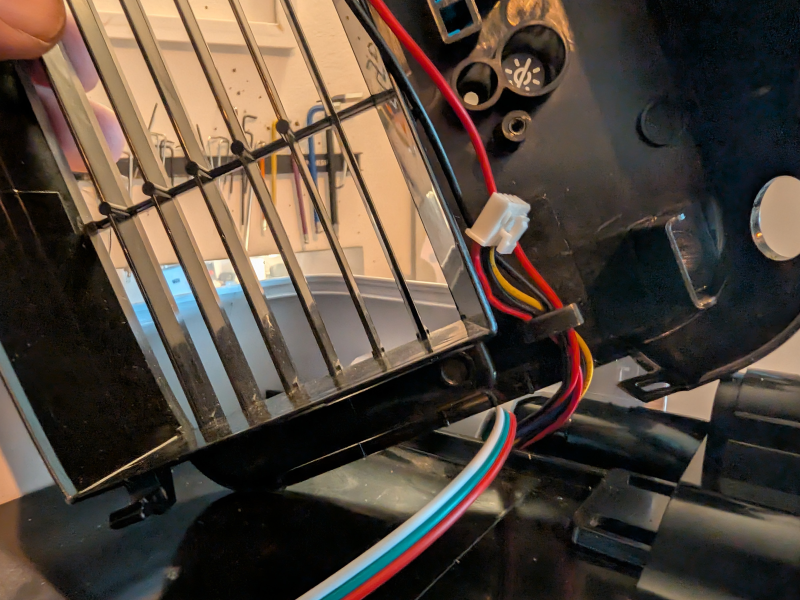
Be careful with the cables — slide them out of the holder on the right side:
PCB fully accessible:
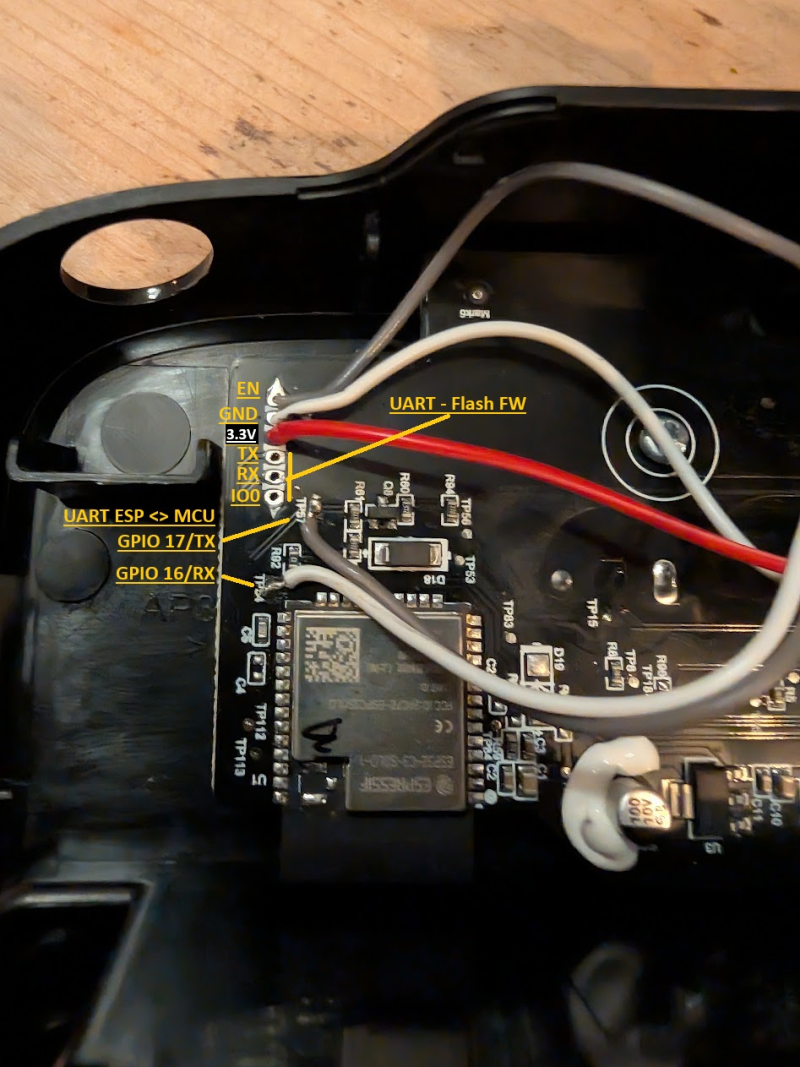
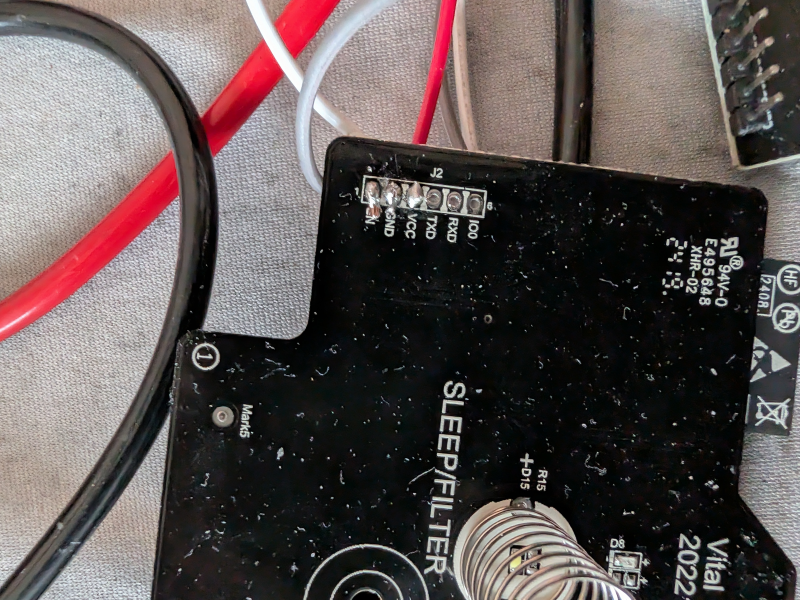
Debug Header Pinout
| Pin | Signal |
|---|---|
| 1 | EN (reset) |
| 2 | GND |
| 3 | 3.3V |
| 4 | TX |
| 5 | RX |
| 6 | IO0 |
Flash Original ESP32
Prerequisites
Connect to the debug header with a USB-UART adapter (3.3V TTL), crossing TX/RX:
- Adapter TX → MCU RX
- Adapter RX → MCU TX
Connect IO0 to GND before powering on to enter bootloader mode.
Backup Existing Firmware
esptool read_flash 0 ALL levoit-vital100s-backup.bin
Note: may fail if watchdog-protected. Try while powered externally.
Configure
- Copy
secrets-example.yaml→secrets.yamland fill in your Wi-Fi and encryption key - Adjust the device name in the config if running multiple units
- Check the component README for UART pin mapping per board
Flash
esphome run levoit-vital100s.yaml
Reassemble and enjoy!
ESPHome Web Builder / Dashboard
Use the pre-generated builder yaml to flash without a local clone — all config is inlined, no !include or packages needed:
| File | Board |
|---|---|
levoit-vital100s-builder.yaml |
original ESP32-C3-SOLO-1 |
levoit-vital100s-builder-c3.yaml |
ESP32-C3 replacement |
levoit-vital100s-builder-s3.yaml |
ESP32-S3 replacement |
Upload to the ESPHome web builder or paste into the ESPHome dashboard. Regenerate with .\make-builder-yaml.ps1 from the devices/ folder.
Restore Original Firmware
esptool erase_flash
esptool write_flash 0x00 levoit-vital100s-backup.bin
Custom Hardware (if PCB/MCU is fried)
Parts used for a full custom replacement build:
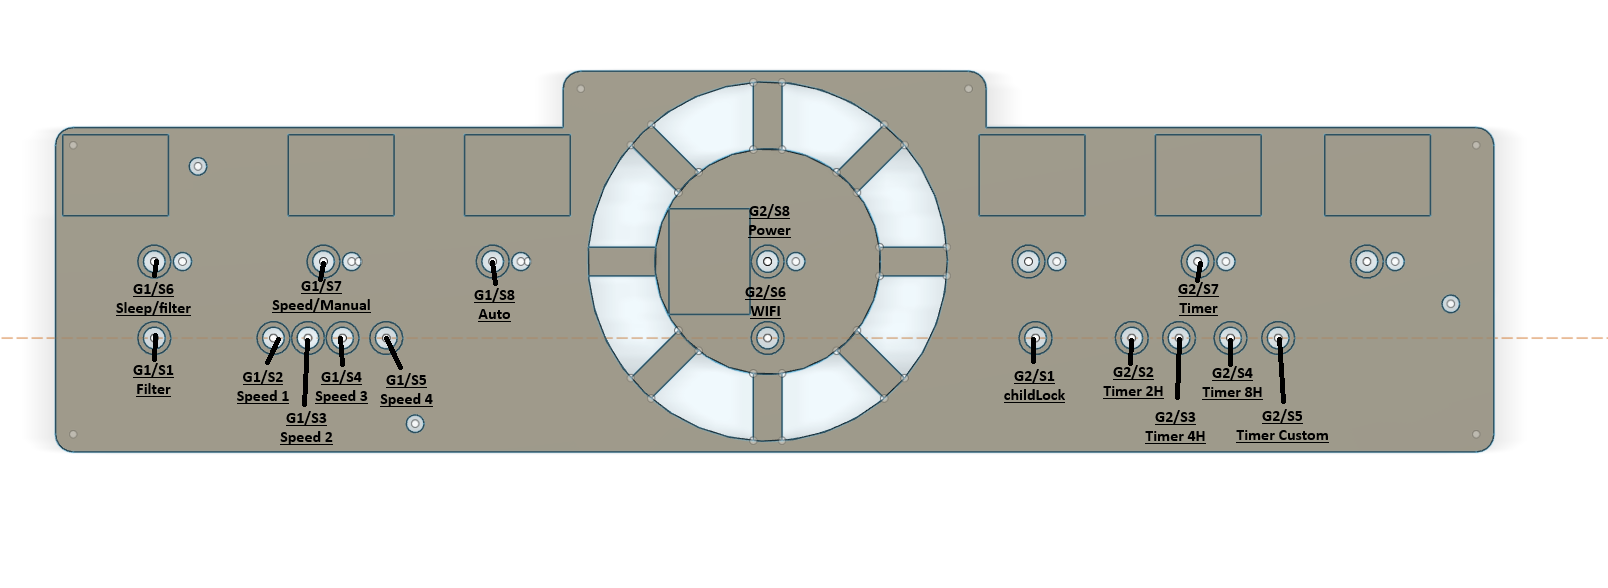
- 7× Touch buttons
- 1× 4-Digit TM1637 Display
- 16× LEDs, 3mm white, 2.7V
- Diode 1N4000
- ESP32 dev kit V4
- Level Shifter
- DC-DC Converter MP1584
Fan PWM info: 24V, 5V signal, 1.6kHz, duty cycle 10–90% (min: 0.1, max: 0.9)
Fan speed signal: 5V, frequency = speed (0=off, 60Hz=slowest, 185Hz=max)
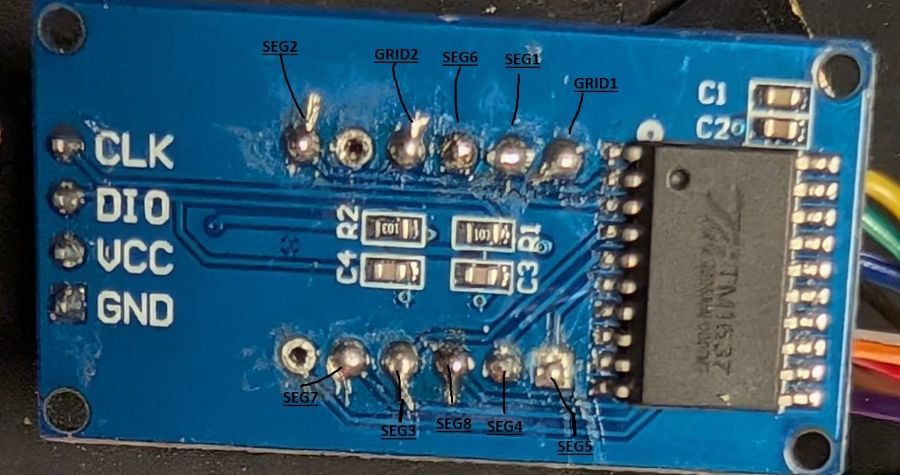
Custom Schematics
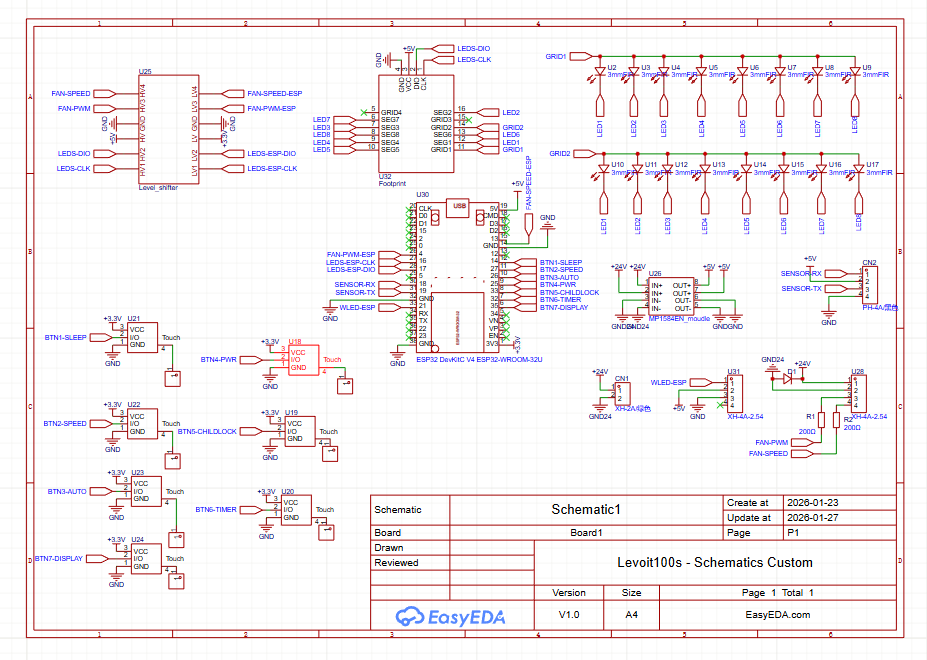
Using AZ-Delivery TM1637 display to drive 16 LEDs: SEG1=LED1, SEG2=LED2, …